I have made
Arizona flag guitars before but I wanted to make one Special for the Arizona
State Fair
This is the short story with pictures
and a link at the bottom to my YouTube Video
The theme
for the Arizona State Fair Guitar is Arizona. When you think of
Arizona you think of Sunsets,
Copper,
Turquoise,
and
Mesquite. So I wanted to
incorporate all of Arizona into a beautiful custom guitar. I thought
it would be Candy Apple Red representing the
Sunsets, and have a double
Tortoise
Shell binding to honor the Arizona Desert Tortoise. I chose to use
Maple for the neck and Mesquite for
the fretboard and pickguard with rifle shell casings for the markers. I wanted all
of the hardware to be Copper so the
Copper Electroplating is where I started
COPPER
ELECTROPLATING THE HARDWARE
To copper
electroplate you have to make a copper sulfate solution and use a 6
volt power supply After
copper plating I used clear powder coat to preserve the copper finish
from patina


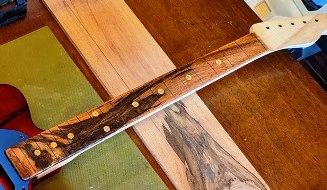
THE NECK and FRETBOARD
For the neck I used a beautiful piece of maple I had in my
inventory but for the mesquite I made several trips to the wood
store and finally found the piece you see here, The piece
underneath the neck in the second picture would eventually be
inlaid with Turquoise and become the pickguard. All of the
Mesquite came from the same board. After building the fretboard
I inlaid the Shell Casings for markers

THE FIRST BODY
Originally I had a piece of
solid Basswood, double bound with tortoise shell binding,
painted candy apple red. I wanted to have the state
flag on the front in some sort of abstract way.
After I did that it didn't have the look I wanted. It
just looked like a painted guitar with a blue
pickguard.
The second picture shows how it is taped off
to create the yellow rays. After Painting the yellow
you take the tape off exposing the red, and you have
alternating red and yellow rays, After I painted it looked good but
wasn't what I wanted.
THE SECOND BODY (Body 2.0)
On some other projects
I have used beetle bark Blue Pine and I love the way the blue streaks in
the wood finish with stain. So I picked out a
piece that had beautiful figuring in the grain and milled it down to a
1/4" thick. I made a jig for my table saw and cut
13 stripes at 14 degrees each. I staggered the
pattern. For the upper bout of the guitar I used
the same type of wood but a solid piece (1/4"
thick) and capped another piece of Basswood. Now
I have a design that I am happy with!

Then I routed the channel on both sides for
the binding

After making sure the binding channel
was free of defects I attached the
binding with a special glue and held it
in place with binding tape while it
dried

After Sanding the entire body smooth, I
was ready to
finish the back and sides with candy apple
red and a durable urethane finish

Then I started the tedious process of
dying the individual stripes, starting
with red.
I used an Transparent
Acrylic Stain because I wanted each ray
to show the different wood grain pattern

Below is the project nearing
completion. I haven't put the
copper star on yet and I'm not
thrilled with the black
pickguard or the copper knobs
but I do like the red pickups
that I wound for this project; I
call them "Arizona Specials"

Below is the final Guitar. I
made a Mesquite Pickguard
because even though I liked
the shape of the
black one I had previously
made the Mesquite matched
the fretboard better, and I
was able to add Turquoise
inlay in it . I custom
crafted a
new set of knobs because the
copper ones needed something
extra. The finished guitar
as entered is
shown below.
If you click on
the picture or the link it
takes you to my YouTube
channel and you can see the
final guitar in a short
video
https://www.youtube.com/watch?v=8TeL1q5oGzI


Connect With Us
Connect With Us Today